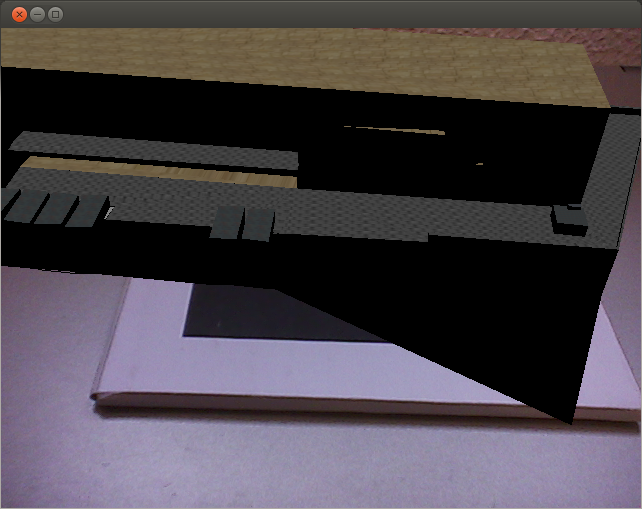
I used to have a problem with Collada-dom 3D models textures. Some times they were not correctly applied and appeared black colored. Just like in this case:

Some time ago I found out that this was related with the locale (the language) in which the Ubuntu system was configured. I usually use my Ubuntu in english and haven’t had any problem until one person lend me a Ubuntu laptop with spanish locale. I was all the weekend trying to figure what was going on (I didn’t get any error message so I was clue less) until I noticed that difference with my working system. I told to my colleague “I know what the problem is but don’t know how to solve, and we are out of time so just install Ubuntu in english”.
Today I made the mistake of installing the spanish locale along side with the english locale in order to have the calendars first day on monday, numbers and dates in spanish way and so on. Then… textures black. So I just uninstalled the spanish locale and though all would be OK again… but no… now the program crashed every time I tried to load a Collada-dom 3D model. But hey, this time I got an error on the console:
locale::facet::_S_create_c_locale name not valid
I could start digging with this! And found out that the problem is with the boost library. Depending on the version of your boost library (I’m using 1.46, and this is supposed to be fixed on 1.48) If the locale is not set to “C” it crashes.
So a quick fix is to export a LC_ALL environment variable to value C. You can do it permanent on your system configuring it on you profile file (in you home folder) or on a terminal just before running your program (in that same terminal of course) like this:
export LC_ALL=C
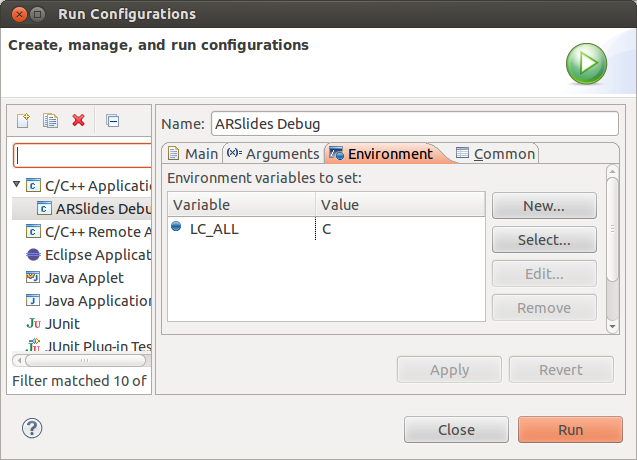
I use Eclipse-CDT to develop so the easiest way to configure this environment variable only for my application is using the Debug/Run Configurations. Click on the small arrow of the Degug or Run buttons and select “Debug Configurations…” or “Run Configurations…”. The got to the “Environment” tab and add the variable:

Hope this helps you because this has been a pain in the $%! for me! And this is how you should see now the 3D model:

UPDATE: Once I changed the locales I found out that when trying to install any package with apt-get a error was telling me that my locales were not correctly set:
perl: warning: Setting locale failed.
perl: warning: Please check that your locale settings:
        LANGUAGE = "en_US:en",
        LC_ALL = (unset),
        LC_TIME = "es_ES.UTF-8",
        LC_MONETARY = "es_ES.UTF-8",
        LC_ADDRESS = "es_ES.UTF-8",
        LC_TELEPHONE = "es_ES.UTF-8",
        LC_NAME = "es_ES.UTF-8",
        LC_MEASUREMENT = "es_ES.UTF-8",
        LC_IDENTIFICATION = "es_ES.UTF-8",
        LC_NUMERIC = "es_ES.UTF-8",
        LC_PAPER = "es_ES.UTF-8",
        LANG = "en_US.UTF-8"
    are supported and installed on your system.
perl: warning: Falling back to the standard locale ("C").
locale: Cannot set LC_ALL to default locale: No such file or directory
As you can see my locales for time, monetary, address, telephone, name, measurement, identification, numeric and paper are in spanish (es_ES.UTF-8), my language is set up to english (es_US.UTF-8) and I have none set for LC_ALL. To fix this error I executed this on the terminal:
export LC_ALL=en_US.UTF-8
sudo locale-gen en_US.UTF-8
sudo dpkg-reconfigure locales
And now the error is gone because all my locale variables are en_US.UTF-8. You can verify your locales running “locale”:
$ locale
LANG=en_US.UTF-8
LANGUAGE=en_US:en
LC_CTYPE="en_US.UTF-8"
LC_NUMERIC="en_US.UTF-8"
LC_TIME="en_US.UTF-8"
LC_COLLATE="en_US.UTF-8"
LC_MONETARY="en_US.UTF-8"
LC_MESSAGES="en_US.UTF-8"
LC_PAPER="en_US.UTF-8"
LC_NAME="en_US.UTF-8"
LC_ADDRESS="en_US.UTF-8"
LC_TELEPHONE="en_US.UTF-8"
LC_MEASUREMENT="en_US.UTF-8"
LC_IDENTIFICATION="en_US.UTF-8"
LC_ALL=en_US.UTF-8
Sources: https://svn.boost.org/trac/boost/ticket/4688
https://svn.boost.org/trac/boost/ticket/5928
http://www.becodemyfriend.com/2011/11/perl-warning-falling-back-to-the-standard-locale-%E2%80%9Cc%E2%80%9D/


