Tag Archives: Objective-C

Using the Xcode Simulator with a Unity 3 Native iOS Plug-In

As you saw in “Building a Unity 3 Application with Native Plugin for iOS” we can create a plug in for native code in iOS with Unity 3. The problem is that by default you can’t test it on the Simulator of Xcode. May be it doesn’t make too much sense to use the Simulator to try a Unity 3 application as the performance in 3D applications may vary significantly from the real device, but if you still don’t own a iOS device you can save the day with this.

Inside the Xcode project in the “Libraries/RegisterMonoModules.cpp” file you can see how the calls to the functions registered as “extern” are inside a block that is only processed it the target IS NOT the Simulator (#if !(TARGET_IPHONE_SIMULATOR)). So we have to pull out from that block both the definition of the function that registers our functions (mono_dl_register_symbol) and our functions them self. Look at the bold lines in the following code:

#include "RegisterMonoModules.h"

extern bool gEnableGyroscope;

extern "C"
{
        typedef void* gpointer;
        typedef int gboolean;
#if !(TARGET_IPHONE_SIMULATOR)
        const char*                     UnityIPhoneRuntimeVersion = "3.5.0f5";

        extern int                      mono_ficall_flag;
        void                            mono_aot_register_module(gpointer *aot_info);
        extern gboolean         mono_aot_only;
        extern gpointer*        mono_aot_module_Assembly_CSharp_firstpass_info; // Assembly-CSharp-firstpass.dll
        extern gpointer*        mono_aot_module_UnityEngine_info; // UnityEngine.dll
        extern gpointer*        mono_aot_module_mscorlib_info; // mscorlib.dll
#endif // !(TARGET_IPHONE_SIMULATOR)
        void                         mono_dl_register_symbol (const char* name, void *addr);
        void    _PassStructFromObjCToUnity();
        void    _Test();
}
void RegisterMonoModules()
{
    gEnableGyroscope = false;
#if !(TARGET_IPHONE_SIMULATOR)
        mono_aot_only = true;
        mono_ficall_flag = false;
        mono_aot_register_module(mono_aot_module_Assembly_CSharp_firstpass_info);
        mono_aot_register_module(mono_aot_module_UnityEngine_info);
        mono_aot_register_module(mono_aot_module_mscorlib_info);


#endif // !(TARGET_IPHONE_SIMULATOR)
        mono_dl_register_symbol("_PassStructFromObjCToUnity", (void*)&_PassStructFromObjCToUnity);
        mono_dl_register_symbol("_HaveObjCDoSomething", (void*)&_HaveObjCDoSomething);
}

We can modify the “PostprocessBuildPlayerscript so we don’t have to do this by hand every time we change our code. Some awk magic will do the trick (not very fancy but it works…):

#!/bin/bash
cp -fR ./iOS\ Build/Libraries ~/Documents/Xcode/my-project/
cp -fR ./iOS\ Build/Data ~/Documents/Xcode/my-project/
rm file.tmp
awk '
{
  if ($0 == "#if !(TARGET_IPHONE_SIMULATOR)" && NR == 9) {
    getline var1;
    getline var2;
    printf "%s\n%s\n%s\n", var2, $0, var1 >> "file.tmp"
  } else if (NR == 32) {
     printf "#endif // !(TARGET_IPHONE_SIMULATOR)" >> "file.tmp"
     printf "\n%s\n", $0 >> "file.tmp"
  } else if ($0 == "#endif // !(TARGET_IPHONE_SIMULATOR)" && NR > 32) {
  } else {
    print $0 >> "file.tmp"
  }
}' ~/Documents/Xcode/my-project/Libraries/RegisterMonoModules.cpp
mv file.tmp ~/Documents/Xcode/my-project/Libraries/RegisterMonoModules.cpp

It is probably a good idea to deactivate “Dead Code Stripping” option in the Xcode project (located in “Linking” from the “Build Settings”) as Xcode might think our extern defined functions will never be called as they are called only from Unity and not from Xcode.

Source: http://answers.unity3d.com/questions/49945/gamekit-linker-failure.html?sort=oldest

Building a Unity 3 Application with Native Plugin for iOS

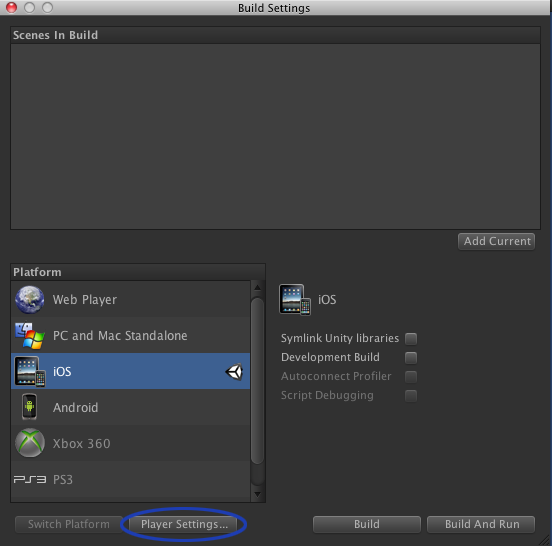
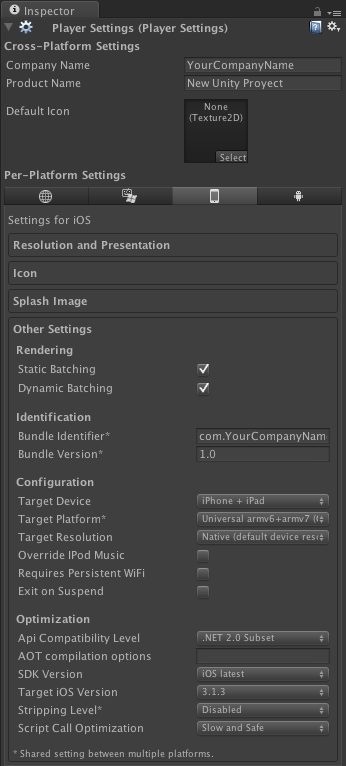
Create a Unity project. Go to “File->Build Settings”, select the iOS platform and then “Player Settings…”. In “Other Settings” on “Identification” configure the “Bundle Identifier” for example with “com.YourCompanyName.YourProductName”

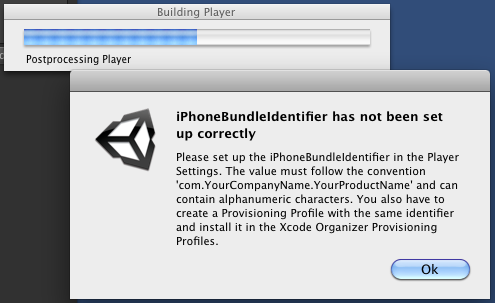
If you don’t do this you would get this error while doing “Build”.

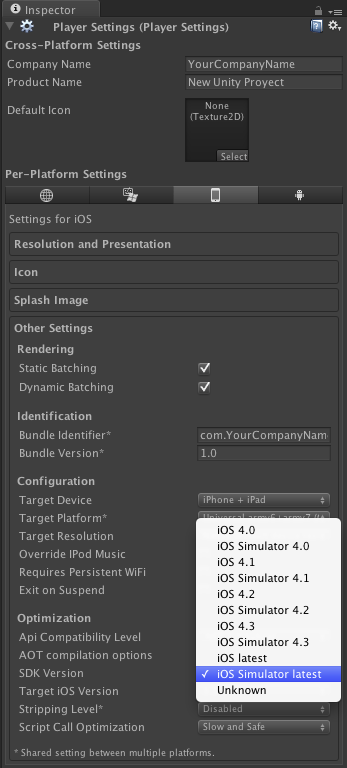
NOTE: If you are going to run the application on the Xcode Simulator you must configure the “SDK Version” to a Simulator version (“iOS Simulator Latest” for example or any other iOS desired version). If you don’t do so (if you select for example “iOS Latest” or any other Device version) you will get hundreds of errors about not defined function for i386 architecture when compiling the Xcode project. If you don’t do this step correctly you will have to do “Build” again in Unity and copy again the “Libraries” and “Data” folder to your Xcode project as I will explain later.

Once we have configured both “Bundle Identifier” and “SDK Version” save the scene and the project anywhere in your computer. When we run “Build And Run” a new Xcode project will be created (called “Unity-iPhone”) inside our Unity project folder in a new folder with any name we want, for example “iOS Build”. You HAVE to copy that folder to another place in your computer, for example were your Xcode projects usually are.

Any time we make a change in the Unity and do a “Build” we will be asked to save the Xcode project it creates, but we can overwrite the original (that one created inside the Unity projects folder) with no problems. But we have to copy ALL the files in “Data” and “Libraries” from the newly created Xcode project by Unity to our Xcode, the one we copied on the very fist time. A script like this can be run after we do a “Build”:

#!/bin/bash
cp -Rf ./iOS\ Build/Data ~/Documents/Xcode/my-project/
cp -Rf ./iOS\ Build/Libraries ~/Documents/Xcode/my-project/

Any way the best option to gain the same effect is to create a PostprocessBuildPlayer script (be careful, this file must have execution permissions) inside “Assets/Editor” (thus we have to create a folder called Editor inside the “Project” view and copy there the script) with the same content as before so the files will be copied automatically to our Xcode project every time we do a “Build” in Unity. The PostprocessBuildPlayer scripts can be shell script or Perl script.

Open our Xcode project and change the extension of the “iPhone_target2AppDelegate.m” file (it can have a different name depending on the Unity version but there is only one “AppDelegate” file so look for a file with “AppDelegate” on its name) to “iPhone_target2AppDelegate.mm” (2 m’s at the end and not only 1). This will make Xcode compile the file as Objetive-C++.

In that file just above “ ...” write:

static iPhone_target2AppDelegate *delegateObject;

Inside the “applicationDidFinishLaunching” method add the following line (in bold here) as the first instruction to execute:

- (void)applicationDidFinishLaunching:(UIApplication *)application {
    delegateObject = self;
    ...
}

At the end of the “AppDelegate” (the “iPhone_target2AppDelegate.mm” file), but before the clausule, write down the following code. This will create 2 methods that will be called from Unity. One of the accepts an struct by reference so we can change its values (the methods to obtain the new values are not defined, they are just examples) and the other one just executes a method from the “AppDelegate” you should create.

NSString* CreateNSString (const char* string) {
    return [NSString stringWithUTF8String: string ? string : ""];
}

char* MakeStringCopy (const char* string) {
    if (string == NULL) return NULL;
    char* res = (char*)malloc(strlen(string) + 1);
    strcpy(res, string);
    return res;
}

struct MyStruct {
    char* stringValue;
    int intValue;
};

extern "C" {    
    void _PassStructFromObjCToUnity ( struct MyStruct *myStruct ) {
        NSLog(@"_PassStructFromObjCToUnity");

        myStruct->stringValue = MakeStringCopy([delegateObject.someStringProperty UTF8String]);
        myStruct->intValue = [delegateObject.someNSNumberProperty intValue];

        printf("-> myStruct->stringValue %s\n", myStruct->stringValue);
        printf("-> myStruct->intValue %i\n", myStruct->intValue);
        NSLog(@"-> complete.");
    }

    void _HaveObjCDoSomething () {
        NSLog(@"_HaveObjCDoSomething");
        [delegateObject doSomething];
        NSLog(@"-> complete.");
    }   
}

Now we go back to our Unity project and inside a C# class in Assets/Plugins/ we could write something like this that will execute the native code methods defined inside “extern "C"” clausule.

using UnityEngine;
using System.Runtime.InteropServices;

public struct MyStruct
{
    public string stringValue;
    public int intValue;
}

public class OBJCPlugin 
{
    [DllImport ("__Internal")]
    private static extern void _PassStructFromObjCToUnity ( ref MyStruct myStruct );

    public static MyStruct PassStructFromObjCToUnity ()
    {
        Debug.Log("OBJCPlugin.PassStructFromObjCToUnity");
        MyStruct data = new MyStruct();
        if ( Application.platform == RuntimePlatform.IPhonePlayer )
        {
                _PassStructFromObjCToUnity( ref data );
        }
        return data;
    }   

    [DllImport ("__Internal")]
    private static extern void _HaveObjCDoSomething ();

    public static void HaveObjCDoSomething ()
    {
        Debug.Log("OBJCPlugin.HaveObjCDoSomething");
        if ( Application.platform == RuntimePlatform.IPhonePlayer )
        {
                _HaveObjCDoSomething();
        }
    }
}

We have just modified the Unity project to call the native code in iOS so we have to do “Build” again and copy the “Libraries” and “Data” folders to our Xcode project (but if we created the PostprocessBuildPlayer script those folders will be copied automatically. This way both the native code in iOS and the calls in C# get together.

If you want to be able to run this Xcode project in the Simulator read the post “Using the Xcode Simulator with a Unity 3 Native iOS Plug-In“.

Sources: http://answers.unity3d.com/questions/10110/specific-steps-to-set-up-a-plugin-for-iphone-in-xc.html
http://www.tinytimgames.com/2010/01/10/the-unityobjective-c-divide/

Use OpenCV in Xcode 4 for an Object Oriented Mac OS X Application

First of all you have to install OpenCV in Mac OS X. Then in Xcode create a new Mac OS X Application project of type “Command Line Tool”.

Set a “Product Name” and choose “Foundation” for “Type” option.

In the “Build Settings” tab (clicking on the projects blue icon on the left) add following values for those options:

Inside “Search Paths”:
Header Search Paths: /usr/local/include
Library Search Paths: /usr/local/lib
Inside “Linking”:
Other Linker Flags: -lopencv_core -lopencv_highgui -lopencv_imgproc

NOTE: You can add more libraries in “Other Linker Flags” to add more OpenCV functionality, for example:

-lopencv_core -lopencv_highgui -lopencv_imgproc -lopencv_legacy -lopencv_contrib -lopencv_calib3d -lopencv_features2d -lopencv_flann -lopencv_ml -lopencv_objdetect -lopencv_video

If you want to also use the C functions available in OpenCV change inside “Build Options” the next parameter:

Compiler for C/C++/Objetive-C: LLVM GCC 4.2

Change the extension of “main.m” file to “main.mm“. This makes the code to be interpreted as Objetive-C++ and not only as Objetive-C.

Now (VERY IMPORTANT) inside the .pch file of the “Supporting Files” folder add BEFORE any other import the following code:

#ifdef __cplusplus
    #import "opencv2/opencv.hpp"
#endif

This is because OpenCV has a MIN macro defined that also exists in Apple framework, and if you don’t have the one in OpenCV you may have errors like “LLVM GCC 4.2 Error: Statement-expressions are allowed only inside functions” or “opencv2/core/core.hpp:433: error: statement-expressions are allowed only inside functions“. The import in surrounded by that “ifdef” so the files that don’t use Objetive-C++ code can maintain the “.m” extension and not be forced to change all them to “.mm“.

Fill “main.mm” with this example code, that is in fact the Object Oriented version code of the previous example in Use OpenCV on Xcode 4 for a Mac OS X Application:

//
// main.mm
// OpenCVOOTest
//
// Created by __MyName__ on 16/09/11.
// Copyright 2011 __MyCompanyName__. All rights reserved.
//

#import 
#import "opencv2/opencv.hpp"

using namespace cv;

int main (int argc, const char * argv[])
{
    NSAutoreleasePool * pool = [[NSAutoreleasePool alloc] init];
    
    Mat img(cv::Size(640, 480), CV_8UC3);
    
    circle(img, cv::Point(320, 240), 100, Scalar(255, 0, 0, 255), 5, 8, 0);
    
    namedWindow("OpenCV Window", CV_WINDOW_NORMAL);

    imshow("OpenCV Window", img);
    
    waitKey(0);
    
    [pool drain];
    return 0;
}

If you have this error while linking:

"Undefined symbols for architecture x86_64:"

Followed by multiple function names, you have to change the programs architecture to i386. Inside “Build Settings” of the project change the option “Arquitectures” to “32-bit Intel”. This by itself may not solve the problem, as OpenCV must be also compiled for a i386 32 bits architecture.

Sources: http://stackoverflow.com/questions/3810800/how-to-include-opencv-in-cocoa-application
http://computer-vision-talks.com/2011/03/opencv-build-script-with-xcode-4-support-is-here