Category Archives: Apache - Page 2

Run shell commands in Mac OS X executing a normal application

Once I installed Apache2+MySQL5+PHP5.3 using MacPorts I wanted to start and stop the services without having to open a terminal window a run the commands myself. This can be achieved creating an AppleScript that executes the command and then saving it as an application.

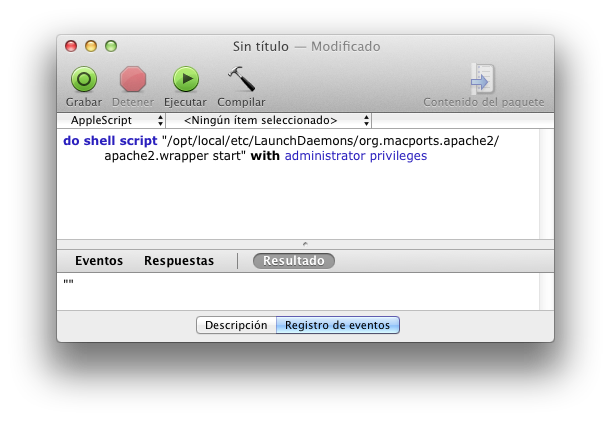
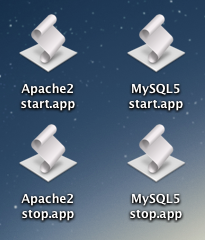
Open the AppleScript editor (Utilities→AppleScript Editor.app) and write the command you want to run. I had to create 4 different applications because I wanted the start and stop applications for both Apache2 and MySQL5. As the commands must be run as an administrator I added at the end “with administrator privileges” (the application will ask for the password):

do shell script "/opt/local/etc/LaunchDaemons/org.macports.apache2/apache2.wrapper start" with administrator privileges
do shell script "/opt/local/etc/LaunchDaemons/org.macports.apache2/apache2.wrapper stop" with administrator privileges
do shell script "/opt/local/etc/LaunchDaemons/org.macports.mysql5/mysql5.wrapper start" with administrator privileges
do shell script "/opt/local/etc/LaunchDaemons/org.macports.mysql5/mysql5.wrapper stop" with administrator privileges

It’s VERY IMPORTANT to clic the “Compile” button to be sure everything is correct and that the application is created. Now you only have to go to “File→Save…” and save it with the “Application” format.

Apache 2 + MySQL 5 + PHP 5.3 + phpMyAdmin 3.5.4 installation script for Mac OS X using MacPorts

Based on the instructions provided by Gilles Fabio I’ve created a complete installation script to install Apache 2, MySQL 5, PHP 5.3 and phpMyAdmin 3.5.4 for Mac OS X using MacPorts.

It’s important to know that as MacPorts compiles all the ports from source you have to have installed “Command Line Tools” (download it from http://connect.apple.com/, an Apple ID is needed) and once installed run xcodebuild -license from the command line to accept the EULA.

It automatically installs and configures everything you need to have a working Apache+MySQL+PHP environment. Once installed the most important files can be located here:

httpd.conf:         /opt/local/apache2/conf/httpd.conf
httpd-vhosts.conf:  /opt/local/apache2/conf/extra/httpd-vhosts.conf
htdocs folder:      /opt/local/apache2/htdocs
php.ini:            /opt/local/etc/php5/php.ini
config.inc.php:     /opt/local/apache2/htdocs/phpmyadmin/config.inc.php
my.cnf:             /opt/local/my.cnf
mysqld.sock:        /opt/local/var/run/mysql5/mysqld.sock

You can download it from my Github repository: installMacPorts-Apache-MySQL-PHP-phpMyAdmin-OSX.sh

Look at my article about how to configure the virtual hosts so you can have multiple websites in the same server.

UPDATE: You can install PHP 5.4 using this guide: https://gist.github.com/2721719

Password protect a Location, LocationMatch or VirtualHost in Apache (XAMPP and Mac OS X)

Protecting a Location or VirtualHost in Apache is very similar to protecting a folder as I explained in “Password protect a folder in Apache (XAMPP and Mac OS X)“. The first part is just the same, creating a file with the user and password you want to use with the htpasswd command. Again, remember to place this file in a folder where no one can download it from the server.

/Applications/XAMPP/xamppfiles/bin/htpasswd -c /Applications/XAMPP/etc/.htpasswd admin
New password: 
Re-type new password: 
Adding password for user admin

Then go to your configuration file where your , and/or tags are and add just the same configuration lines as we did for protecting a folder with .htaccess file. For example to protect the XAMPP special locations open /Applications/XAMPP/xamppfiles/etc/extra/httpd-xampp.conf file and add the lines in bold font:


    AuthName "Protected Area"
    AuthType Basic
    AuthUserFile /Applications/XAMPP/xamppfiles/etc/.htpasswd
    Require valid-user

    Order deny,allow
    Deny from all
    Allow from ::1 127.0.0.0/8 \
               fc00::/7 10.0.0.0/8 172.16.0.0/12 192.168.0.0/16 \
               fe80::/10 169.254.0.0/16

    ErrorDocument 403 /error/XAMPP_FORBIDDEN.html.var

To password protect a VirtualHost just edit the /Applications/XAMPP/xamppfiles/etc/extra/httpd-vhosts.conf file and add the same lines to your VirtualHost. For example:


    AuthName "Protected Area"
    AuthType Basic
    AuthUserFile /Applications/XAMPP/xamppfiles/etc/.htpasswd
    Require valid-user
    ServerAdmin webmaster
    DocumentRoot "/Users/user/Documents/Webs/test.local"
    ServerName test.local
    ServerAlias test.local
    ErrorLog "logs/test.local-error_log"
    CustomLog "logs/test.local-access_log" common
    DirectoryIndex index.php index.html index.htm
    
        #IndexOptions +FancyIndexing NameWidth=*
        #Options Includes FollowSymLinks Indexes
        AllowOverride All
        Order allow,deny
        Allow from all
    

Password protect a folder in Apache (XAMPP and Mac OS X)

First you have to create a file with the user and the password to be used with htpasswd:

/Applications/XAMPP/xamppfiles/bin/htpasswd -c /Applications/XAMPP/etc/.htpasswd admin
New password: 
Re-type new password: 
Adding password for user admin

It’s important to place this file in a place not available from the web service thus no one can download that file. Then add a .htaccess file to the folder you want to protect:

vi /Users/user/Documents/Webs/test.local/.htaccess

And add this content:

AuthName "Protected Area"
AuthType Basic
AuthUserFile /Applications/XAMPP/etc/.htpasswd
require valid-user

Reload the Apache server and then when you try to access to that folders URL you will get an auth prompt like this:

Source: Stabeler.

Configure virtual hosts for XAMPP in Mac OS X

Lets suppose we want to have 2 virtual hosts in our server wich will be accesible via http://web1.com and http://web2.com and their content will be stored respectively in:

/Users/user/Documents/Webs/web1.com

and

/Users/user/Documents/Webs/web2.com

Firts we have to configure web1.com y web2.com to be resolved to our computer. We could configure a DNS server for that task but it’s much simpler to edit the /etc/hosts file and add:

127.0.0.1 web1.com
127.0.0.1 web2.com

Check in a terminal that doing ping to those names they are resolved as 127.0.0.1:

$ ping web1.com
PING web1.com (127.0.0.1): 56 data bytes
64 bytes from 127.0.0.1: icmp_seq=0 ttl=64 time=0.044 ms
64 bytes from 127.0.0.1: icmp_seq=1 ttl=64 time=0.068 ms

Download XAMPP and install it.

Edit /Applications/XAMPP/etc/httpd.conf and change User and Group parameters to your user name and staff group.

User user
Group staff

Uncomment the line that includes the virtual hosts configuration file:

# Virtual hosts
Include /Applications/XAMPP/etc/extra/httpd-vhosts.conf

Edit Applications/XAMPP/etc/extra/httpd-vhosts.conf and delete 2 example VirtualHost that come by default and add the following:


    ServerAdmin webmaster
    DocumentRoot "/Applications/XAMPP/xamppfiles/htdocs"
    ServerName localhost
    ServerAlias localhost
    ErrorLog "logs/localhost-error_log"
    CustomLog "logs/localhost-access_log" common


    ServerAdmin webmaster
    DocumentRoot "/Users/user/Documents/Webs/web1.com"
    ServerName web1.com
    ServerAlias web1.com
    ErrorLog "logs/web1.com-error_log"
    CustomLog "logs/web1.com-access_log" common
    DirectoryIndex index.html
    
        #IndexOptions +FancyIndexing NameWidth=*
        #Options Includes FollowSymLinks Indexes
        #AllowOverride All
        Order allow,deny
        Allow from all


    ServerAdmin webmaster
    DocumentRoot "/Users/user/Documents/Webs/web2.com"
    ServerName web2.com
    ServerAlias web2.com
    ErrorLog "logs/web2.com-error_log"
    CustomLog "logs/web2.com-access_log" common
    DirectoryIndex index.html
    
        #IndexOptions +FancyIndexing NameWidth=*
        #Options Includes FollowSymLinks Indexes
        #AllowOverride All
        Order allow,deny
        Allow from all
    

As you can see there is also a VirtualHost for the root of XAMPP thus we can access status info of the server and phpMyAdmin console opening http://localhost.

Put inside our 2 web folders a index.html file with some content, start XAMPP and check you can access both virtual hosts URLs and that you see index.html content. You can change DirectoryIndex value to a list of files and XAMPP will load the first one it finds. For example to try loading first index.php and then index.html:

DirectoryIndex index.php index.html

If you want to access the folder content of the directories just uncomment first 3 lines in ... tag. Other way you would get a 403 error.

  • Page 2 of 2
  • <
  • 1
  • 2